Match the puzzle to its region
Match the board before following a solution: mirror positions, character abilities, and lily-pad timing can change the route. These five solutions cover Mirrors and Stones and Heroes and Mirrors, with access requirements and resources for finding other boards.
After the tutorial, collect the map above the Crossroads. This hub connects the four starting worlds. Identify your destination by its direction and main mechanic.
| Direction from Crossroads | Region | Main puzzle focus |
|---|---|---|
| North | The Hearty Heroes of Hauling | Character abilities, pushing, and pulling |
| East | The Mirror Isles | Reflections, position swaps, and island access |
| South | Skipping Stones to Lonely Homes | Water crossings, stones, and route planning |
| West | Vault of the Beamcasters | Light beams, gems, and grid constraints |
The regional walkthrough index suggests exploring north, east, south, then west. Switch paths if you become stuck.
Before following a move sequence, check:
- The number and starting positions of mirrors.
- Which characters are present.
- The positions of crystals, stones, and buttons.
- Whether nearby barriers have already disappeared.
Gold rooms and route notation
Mirrors and Stones lies southeast, while Heroes and Mirrors is in the northeast. Each is reached through a corresponding gold room.
| Destination | Access requirements | Route into the area |
|---|---|---|
| Mirrors and Stones | Progress in Skipping Stones and The Mirror Isles, then open the MxS gold room | Use the entrance at the bottom of the gold room |
| Heroes and Mirrors | Unlock a golden mirror in The Mirror Isles and follow the route through The Hearty Heroes of Hauling to HxM | Complete the gold room’s puzzle sequence, then push the unlocked crystal right |
For detailed access help, see the MxS gold room guide or HxM gold room guide.
The routes below use grid movement. A direction without a number means one square. When an instruction says to push an object, the count describes how far that object moves.
| Instruction | Meaning |
|---|---|
| Right | Move or push one square right |
| Up x3 | Move or push three squares up |
| All the way down | Continue downward until a barrier or the path’s end stops movement |
Activate mirrors separately from walking and pushing. Check your column before each activation, and watch lily-pad timing in water puzzles.
Mirrors and Stones puzzle solutions
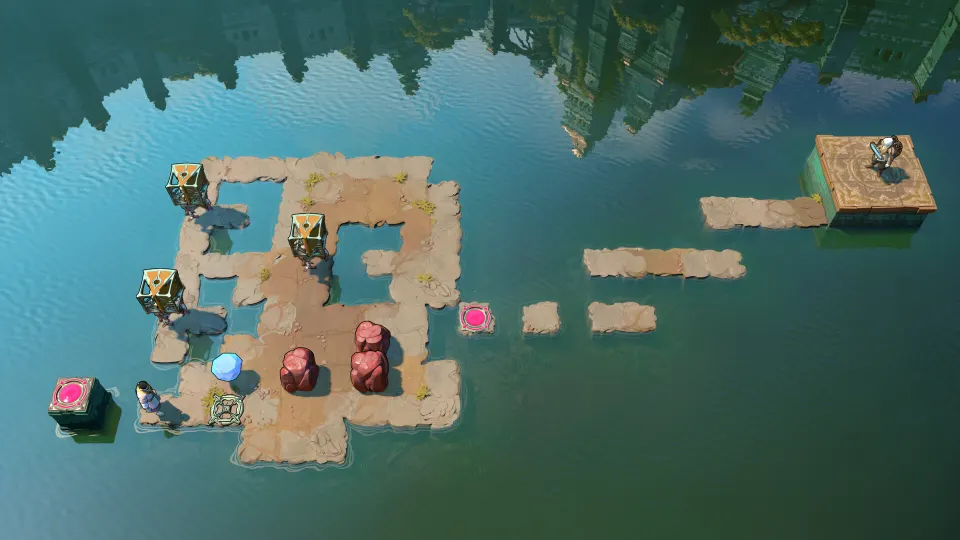
These screen labels follow Game Rant’s Mirrors and Stones walkthrough. Use its board images to confirm the layout before beginning.
Screen 1: bottom puzzle
The goal is to transfer the crystal to orange’s island, then use it to reach the upper teleporter.
-
With orange, place the mirror in the upper-left corner of his island. Move orange clear of its path.
-
With teal, push the crystal onto the lily pad. Push the skipping stone right, then downward as far as possible. This sends the pad and crystal left.
-
Activate the mirror when the moving pad enters its column. The crystal transfers to orange’s island.
-
Have orange push the crystal upward into the water, opening access to the top teleporter.
Completion clears a barrier leading toward the next screen.
Screen 2: reach the lower-left puzzles
Watch the lily pad traveling in the lower-left current. When it reaches that current’s bottom-right corner, step onto the accessible pad. Activate the mirror to transfer to the lower-left pad and reach the puzzle entrances.
Screen 2: bottom-left puzzle 1
Keep track of mirror 1 on the left island and mirror 2 on the middle island.
-
Push mirror 1 up x4, then right x4. Walk left x4 and activate the mirror to reach the middle island.
-
Push mirror 2 left x2, then up x3. Walk down x2 and teleport to the square above the skipping stone.
-
Push the stone down, left x3, up x2, then left x2. Push it upward across the water to the left island.
-
Move mirror 2 down x2, then right as far as possible.
-
Stand in mirror 1’s column and teleport back to the left island. Push mirror 1 left x4, then down as far as possible.
-
Position the stone one column left of the lily pad. Push it downward into the water to send the pad right.
-
Walk left and activate the mirror to board the pad. When the pad reaches mirror 2’s column, activate the mirror again to reach the teleporter.
Screen 2: bottom-left puzzle 2
Here, two submerged crystals provide the positions needed to redirect the lily pad.
-
Push the mirror left x2 and up x3.
-
Move the right crystal into the mirror’s column, then downward as far as possible. Activate the mirror to submerge it one column left of the pad.
-
Push the mirror left, then down. Move the other crystal into the island’s bottom-left corner and activate the mirror. It submerges directly below the first crystal.
-
Push the mirror up. Move the skipping stone onto the lower submerged crystal.
-
Teleport onto the upper submerged crystal using the mirror. Push the stone down into the water, sending the pad right.
-
Quickly activate the mirror to return to the island. Board the passing pad and ride it to the teleporter.
Heroes and Mirrors puzzle solutions
The numbering here follows Game Rant’s Heroes and Mirrors walkthrough. Screen 1’s lower puzzles require progress on screen 2 first.
Reach screen 1’s bottom puzzles
Complete the middle puzzle on screen 2 to remove the barrier in the corridor connecting the screens. Then use the reset tile in screen 2’s bottom-left corner.
Push the nearby bottom-left mirror through this sequence:
- Right as far as possible.
- Up, then right x2.
- Down x6, then left x2.
- Up once.
The mirror should now be on screen 1, five squares right of the blue button. Stand on that button and activate the mirror to reach the puzzles.
Screen 1: bottom puzzle 1
This route uses the crystal to hold the pink button, then removes it after you pass the first barriers.
-
Push the mirror right x2 and stand on its right side.
-
Activate the mirror, then push it onto the pink button.
-
Push the crystal down x3.
-
Move the mirror up x2 and right x2. Stand on the pink button.
-
Activate the mirror to transfer the crystal, then push the crystal onto the pink button.
-
Push the mirror left x2, positioning it above the crystal.
-
Walk beyond the first set of barriers. Activate the mirror to remove the crystal from the button, then continue to the teleporter.
Screen 1: bottom puzzle 2
Both characters must prepare their mirror positions before the final transfer.
-
Place green on the green button.
-
With orange, push his mirror down, then right x5. It should align with his pink button.
-
Put orange on the pink button. Switch to green and pull her mirror up, then left x5, aligning it with her green button.
-
Return green to the green button. Activate the mirrors to send both characters to their teleporters.
Completing this puzzle removes two barriers on screen 1.
Maps, videos, and solution checks
For other boards, choose a resource for identification, movement instructions, or a visual demonstration.
| Resource | Useful features |
|---|---|
| Sinking Star Guide interactive map | Region filters and searchable puzzle entries |
| Sinking Star Guide puzzle index | Mechanic-based guides with separate coverage labels |
| Wikitactics | Playable solution demonstrations, hints, submissions, and reports |
| Postmode walkthrough playlist | Regional videos, gold rooms, and overworld routes |
Postmode covers Skipping Stones, Vault of the Beamcasters, Mirrors and Stones, and gold rooms. Match island outlines and object positions; video numbers may differ from another guide’s screen labels.
The Wikitactics creator’s announcement says most solutions come from a solver engine. Players can report routes that fail in-game. Check that your board matches the listed starting state.
FAQ
Where can I find solutions for other puzzles?
For more order of the sinking star puzzle solutions, search the interactive map by region or puzzle name. Use a video walkthrough when mirror timing, lily-pad movement, or the route between boards is difficult to follow in text.
Must I complete the starting regions in a fixed order?
North, east, south, then west is a suggested exploration order. The Crossroads lets you switch routes. However, entering a combined area can require progress in both of its associated starting worlds, as with the MxS gold room.
Why are the bottom puzzles on Heroes and Mirrors screen 1 inaccessible?
You must first solve the middle puzzle on screen 2. That clears the connecting corridor barrier. Afterward, use screen 2’s reset tile and move the bottom-left mirror into screen 1 using the route above.
What should I include when asking for help?
Give your platform, current character, nearest landmark or note text, and the objects on the board. Include a screenshot before the troublesome move and describe which interactions failed. For these routes, also identify the screen and puzzle position so helpers can distinguish nearby boards.