Position Yourself Before Using a Mirror
The Mirror Isles rewards careful positioning: moving the trader before activating a mirror can put an otherwise unreachable island within reach. Your destination is the square occupied by your reflection, so inspect that square before every swap. The opening three stages teach this through stationary mirrors, movable mirrors, and rock bridges.
Located on the eastern branch of Order of the Sinking Star, this region builds its puzzles around exchanging positions with a reflected image. The routes below cover the first three stages, followed by guidance for identifying later boards, troubleshooting difficult crossings, and understanding the connection to Heroes and Mirrors.
| Element | How it affects the opening puzzles |
|---|---|
| Trader position | Determines the reflected position available for a swap. |
| Mirror position | Moving a mirror changes the crossing you can arrange. |
| Rocks | In Stage 3, rocks pushed into water create bridges between islands. |
| Board layout | Island shapes, mirror placement, and your starting square determine whether a route applies. |
Before activating a mirror, identify the island you want to reach and check where your reflection stands. If those positions do not match, adjust your position or the mirror first. This habit becomes especially useful when a puzzle requires several crossings with different setups.
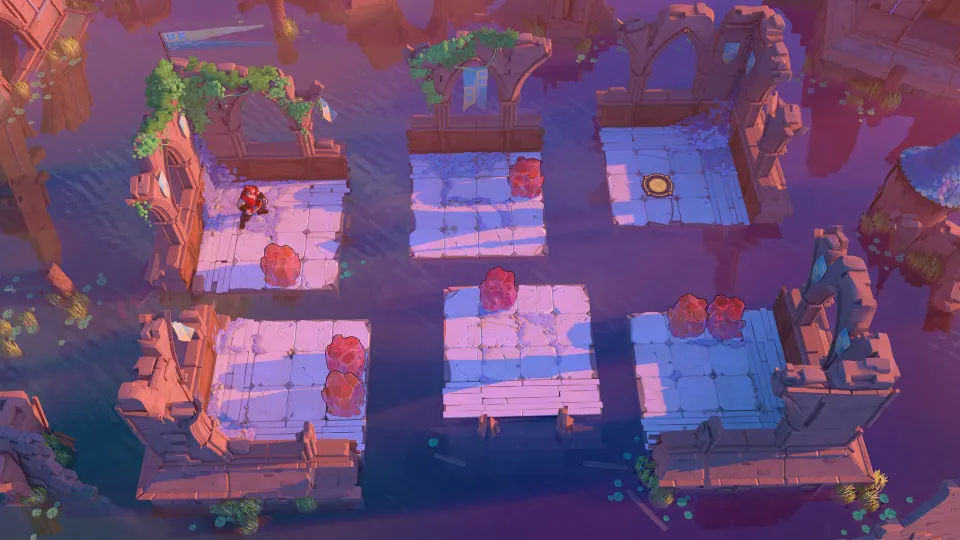
Opening Walkthrough: Stages 1–3
These stage numbers follow Hardcore Gamer’s Mirror Isles Part 1 walkthrough. Compare the described layout with your board before starting, especially when using a community route with a different naming system.
Directions describe movement on the board: north is up, south is down, west is left, and east is right. Where a tile count appears, follow it exactly. Where the route uses an island or shoreline as a landmark, check your reflection to establish the stopping point.
| Stage | Main task | Setup to watch |
|---|---|---|
| 1 | Reach the exit through two reflection swaps. | Leave the mirror in its starting position. |
| 2 | Reposition mirrors to connect the islands. | Move the first mirror to the leftmost usable land square. |
| 3 | Build bridges and transport the mirror. | Start by pushing the first rock right once and up three times. |
Stage 1: Cross Without Moving the Mirror
- Stay aligned with the mirror and walk south as far as the island allows.
- Activate the mirror to exchange places with your reflection and reach the northwest island.
- On that island, walk left to the shoreline, maintaining the alignment needed for the next swap.
- Activate the mirror again to reach the southernmost island.
- Walk to the exit.
The important discovery is that your walking position supplies the necessary setup. You can finish this stage without pushing the mirror.
Stage 2: Reposition the Mirrors
- Push the first mirror left to the last land position before the water.
- Walk right until your reflection reaches the southern island.
- Activate the mirror to cross.
- On the southern island, push the mirror up and then right.
- Walk south until your reflection lines up with the island containing the exit.
- Swap across and leave through the exit.
Check the destination after moving each mirror. The route depends on placing your reflection on the next island, so take a moment to inspect the result before activating it.
Stage 3: Build Bridges Before the Final Crossing
-
Push the first rock one tile right, then three tiles up. It enters the water and creates a bridge to the middle island.
-
Use the mirror to reach the western island.
-
Push the mirror north until it aligns with the northern island.
-
Walk south and activate the mirror to reach that northern island.
-
Push the nearest rock one tile left and two tiles south, creating another bridge.
-
Push the remaining rock across that bridge and use it to establish a connection to the western island.
-
Move the mirror onto the middle island.
-
Cross the first bridge to position yourself for the final reflection.
-
Activate the mirror to reach the eastern island and its exit.
The bridges make it possible to move the mirror into its final position. If the eastern island remains unreachable, check that you have completed both the bridge construction and the mirror transfer.
Match Later Puzzles to the Correct Board
The Mirror Isles regional directory lists 27 release-map locations and 27 community routes. Those totals describe directory entries; they do not establish that every route has been replayed successfully in the released game.
Some routes retain Demo labels, while others come from newer references. Compare the board preview before following a move sequence. A familiar number alone does not establish that you have found the right solution.
| Directory label or detail | How to use it |
|---|---|
| Mirror 1 | The documented example is a four-island Demo board with a two-swap route. |
| Mirror 6 and Mirror 6 Alt | Treat these as separate layouts and compare their previews. |
| Demo designation | Check the starting arrangement against your current board. |
| Release-map location | Identifies a location without necessarily verifying its associated route in release play. |
Compare these details before beginning:
- The number and shapes of the islands.
- The positions of mirrors and movable objects.
- The trader’s starting square.
- Any variant designation attached to the board name.
If you report a route mismatch, include the original community board ID. Descriptive names can help, but not every Demo label has been matched to a released level name.
Troubleshoot Failed Swaps and Longer Crossings
When a swap produces an unexpected result, undo the previous move and inspect the reflection again. This gives you a useful checkpoint: you can see whether the problem began with your walking position, a mirror push, or a route intended for another layout.
| Problem | What to check next |
|---|---|
| Your reflection misses the destination island. | Inspect your current square and the mirror’s position before swapping. |
| A sequence stops matching your board. | Compare the initial layout and any alternate-board label. |
| Stage 3’s exit remains out of reach. | Confirm that the mirror has reached the middle island. |
| A long crossing repeatedly falls short. | Consider whether the puzzle requires intermediate placements. |
A community discussion of the demo’s 75th puzzle describes a substantial difficulty increase involving repeated projections and careful use of available space. That numbering refers to the discussed demo progression; it should not be used as a universal Mirror Isles level number.
For that particular challenge, players emphasize planning intermediate positions along a useful diagonal. Several describe getting stuck after trying to stretch one crossing to its maximum distance. The breakthrough involved using the mechanic repeatedly and choosing a better initial placement.
Treat that as a hint for the matching board, not a move sequence for every later puzzle. Before committing to a long setup, identify where the first intermediate landing leaves you and whether it supports another crossing.
Continue Toward Heroes and Mirrors
Progress in The Mirror Isles also contributes to accessing Heroes and Mirrors, a northeast area that combines mechanics from different regions.
According to GameRant’s Heroes and Mirrors walkthrough, reaching it involves unlocking a golden mirror in The Mirror Isles and following a path in The Hearty Heroes of Hauling. These lead toward the HxM gold room.
The progression is:
- Unlock the golden mirror in The Mirror Isles.
- Follow the relevant path in The Hearty Heroes of Hauling to reach and open the HxM gold room.
- Complete the room’s puzzle sequence.
- Find the crystal that unlocks on the golden platform.
- Push that crystal right to create the route into Heroes and Mirrors.
Once inside, access to the puzzles on screen 1 depends on solving the middle puzzle on screen 2. Remember that dependency if the first screen appears inaccessible.
FAQ
What does this walkthrough cover?
This order of the sinking star mirror isles walkthrough covers the first three stages, reflection positioning, later-board identification, troubleshooting, and the progression connection to Heroes and Mirrors. It does not provide a complete move sequence for all 27 directory entries.
Do you need to move the mirror in Stage 1?
No. Walk south while aligned with it, swap to the northwest island, then move left to prepare the second swap. That crossing takes you to the southernmost island, where you can reach the exit.
Why does a community solution fail on my board?
Check the layout and starting position first. The directory includes alternate boards and routes carrying Demo labels. Mirror 6 and Mirror 6 Alt, for example, should be checked separately. Undo an unexpected move and compare the reflection before continuing.
Are all 27 community routes verified for the released game?
The regional directory does not claim that every route has been replayed in the released game. Its 27 locations and 27 routes are directory totals, with version distinctions retained where applicable.
What should you do when a crossing is always too short?
Inspect the reflected destination and reconsider the initial setup. On the difficult demo board discussed by players, reaching the goal requires intermediate placements. A longer series of crossings may be necessary even when a direct crossing looks almost possible.